Crestone Peak and Crestone Needle: A Complete Guide to the Classic Sangre de Cristo Traverse
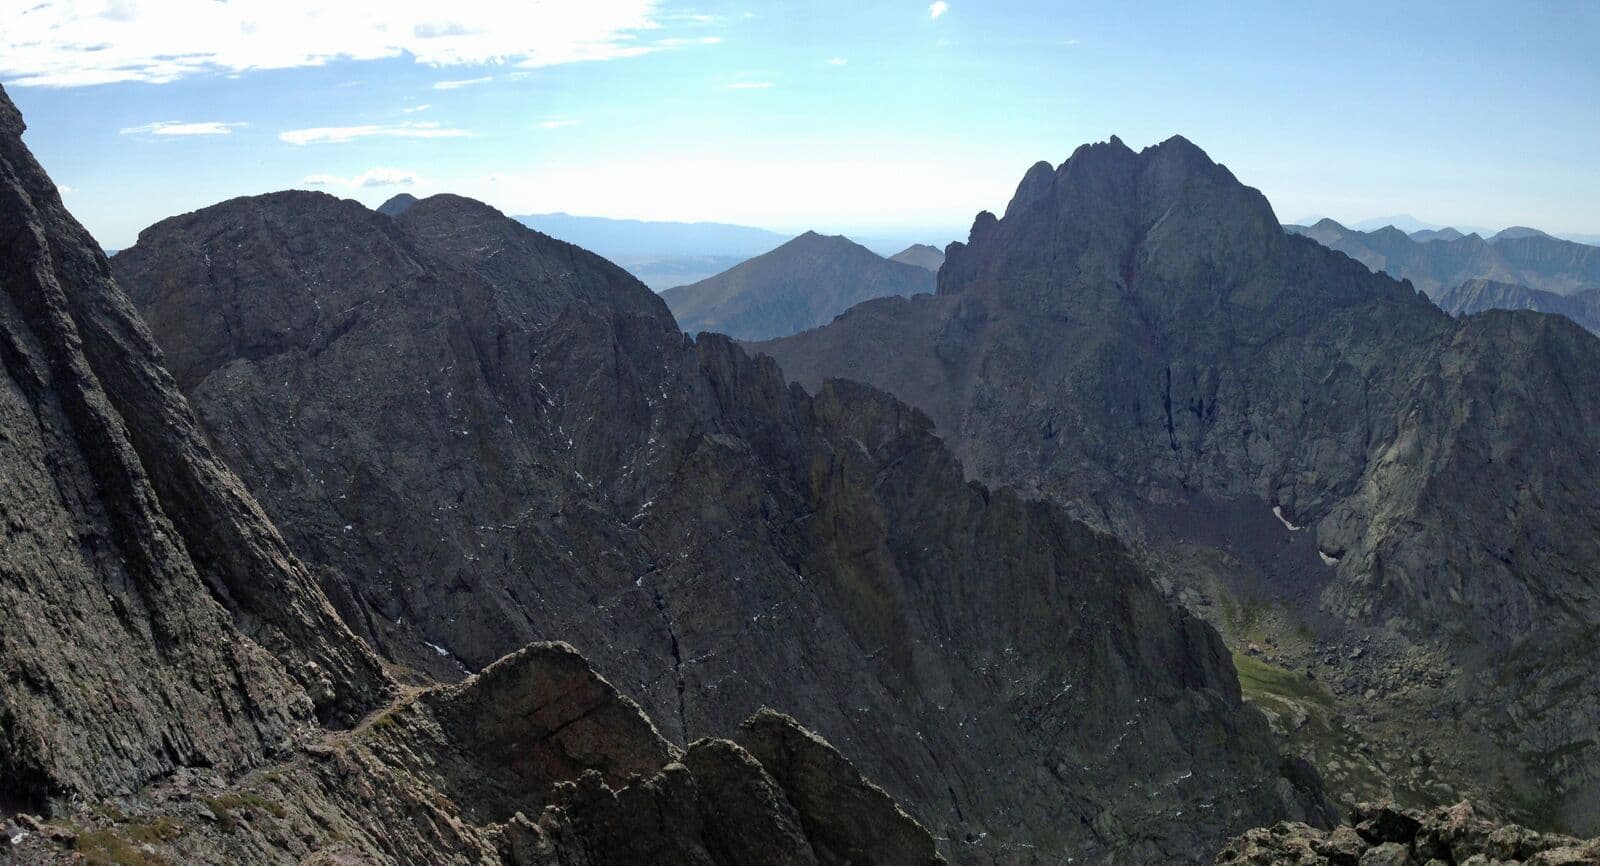
Crestone Peak (14,294 ft) and Crestone Needle (14,197 ft) sit 0.4 miles apart on the spine of the Sangre de Cristo Range in southern Colorado. Both are routinely listed among the most aesthetic 14ers in the state, and both demand real Class 3 scrambling on solid conglomerate rock. The connecting traverse between them is one of the four "Great Traverses" of Colorado's 14ers, a Class 3+ line with sustained exposure and consequential route-finding.
The rock here is genuinely different. Most Colorado 14ers are climbed on rotten volcanic or loose metamorphic talus that punishes you with every step. The Crestones are conglomerate: a hardened mix of pebbles and matrix that climbs more like granite, with sticky friction and positive holds. It is a rare gift in a state where loose rock is the norm. The catch is that the routes wander, the exposure is real, and a fall on the traverse has no margin.
This is not a peak for first-time 14er hikers. If your hardest scramble to date was the summit boulders on Quandary, this guide will tell you what you need to learn before you attempt the Crestones. If you have solid Class 3 experience and want to climb the most striking peaks in the Sangres, this guide covers the standard routes on both peaks, the traverse, and the logistics that make or break the trip.
What You'll Learn
- Quick Stats
- Who Should Attempt This
- Getting to the Trailhead
- The South Colony Lakes Approach
- Crestone Needle: South Face Route
- Crestone Peak: Red Gully Route
- The Crestone Traverse
- What to Pack
- Timing and Weather
- When to Climb
- Camping vs Day Hiking
- What Makes the Crestones Different
- Common Mistakes
Quick Stats
Crestone Needle (South Face, standard route):
- Elevation: 14,197 ft
- Trailhead: South Colony Lakes 2WD parking, 8,780 ft
- Round Trip Distance: 13.5 miles (from 2WD lot)
- Elevation Gain: 5,800 ft
- Class: 3 (sustained scrambling, real exposure)
- Time: 10-14 hours from the lower lot
Crestone Peak (Red Gully, standard route):
- Elevation: 14,294 ft (7th highest in Colorado)
- Round Trip Distance: 14 miles (from 2WD lot)
- Elevation Gain: 6,000 ft
- Class: 3
- Time: 11-15 hours from the lower lot
Both peaks via the traverse (from South Colony Lakes camp):
- Round Trip Distance: ~13 miles total
- Elevation Gain: ~6,500 ft
- Class: 3+ on the traverse (sustained exposure)
- Time: 12-16 hours for the climbing day, plus approach and exit
Best Season: Mid-July through September
Permit: None required; wilderness rules apply
Crowds: Steady on weekends, never crowded compared to Front Range peaks
Who Should Attempt This
The Crestones are not a difficulty step beyond Mount Elbert or Grays Peak. They are a different category of mountain. Before you commit to this trip, you should have:
Solid Class 3 experience on real rock. Not the summit pile on Mount Bierstadt. Actual sustained Class 3 scrambling on routes like Longs Peak Keyhole, Wetterhorn Peak, or Mount Sneffels. If you've never used your hands continuously for 30 minutes on exposed rock, the Crestones are not the place to learn.
Route-finding skills in alpine terrain. Both Crestone routes wander through gully systems with multiple plausible lines, some of which cliff out or drop you onto loose terrain. The traverse in particular requires reading rock features and choosing the right ledge system in real time. A GPS track helps but does not replace judgment.
Comfort with exposure. The traverse has sections with hundreds of feet of fall potential below your boots. If exposure makes you freeze, you will get stuck on the traverse and the only way out is the way you came.
A helmet and the knowledge to use it. Rockfall on these routes is real. Other parties above you will dislodge stones. Wear the helmet from the base of the Red Gully on Crestone Peak through the descent.
Weather discipline. A storm on the traverse is a survival problem, not an inconvenience. You need to be willing to turn around at any point if the sky changes.
If any of the above made you uncomfortable, climb a Class 2 14er or two more before committing to the Crestones. There is no shame in waiting. The mountain will still be here.
Getting to the Trailhead
Both Crestone routes start from the South Colony Lakes basin on the east side of the range. The approach is from Westcliffe, a small ranching town about 4 hours from Denver, 3 hours from Colorado Springs.
From Westcliffe:
- Drive south on Colorado Highway 69 about 4.5 miles
- Turn right (west) onto Colfax Lane
- Follow Colfax Lane about 5.5 miles to the South Colony Lakes Road junction
- Turn right onto South Colony Lakes Road
The road then splits the climber population in half. The lower 2WD parking area sits at 8,780 ft. From there, the road continues another 2.7 miles to the upper 4WD trailhead at roughly 11,000 ft.
The 4WD section is the real story. This is not a graded gravel road like Halfmoon Creek. South Colony Road has been notoriously rough for years: deep ruts, eroded sections, large embedded rocks, and a stream crossing that varies year to year. A stock Tacoma or 4Runner with all-terrain tires and good clearance handles it, slowly. A Subaru Outback does not. A rented Jeep Wrangler does. Most climbers drive what they have, park where their suspension says enough, and walk the rest.
Plan as if you are walking from the 2WD lot. The road conditions change every season after spring runoff. Even if other reports say it is "passable," your vehicle and your driving comfort decide where you park. Adding 2.7 miles each way at 8,780-11,000 ft is significant but manageable if you planned for it.
Total drive from Denver: 4 hours to Westcliffe, plus 30-90 minutes on South Colony Road depending on vehicle.
Restrooms: Pit toilets at the lower 2WD lot. Nothing higher.
Cell service: None at the trailhead. None on the route.
The South Colony Lakes Approach
From the upper 4WD trailhead at roughly 11,000 ft, a maintained trail follows the South Colony Creek drainage west into the basin. From the lower 2WD lot, you walk the road first.
The approach trail climbs steadily through evergreen forest, then opens into the upper basin at around 11,800 ft. South Colony Lakes (Upper and Lower) sit in a glacial cirque with the peaks rising directly above. The lakes are the standard camping zone for parties splitting the trip across two days.
From the lakes basin, the route splits depending on which peak or combination you are climbing:
- Broken Hand Pass is the gateway to Crestone Needle's South Face and to Cottonwood Lake on the Peak side of the range. You climb a steep, loose gully from the upper basin to the pass at roughly 12,940 ft. This is not technically difficult, but it is loose, and a slip sends you back down the gully fast.
- Cottonwood Lake sits below Crestone Peak's south face, on the other side of Broken Hand Pass. Parties climbing the Peak alone descend to this lake from the pass and approach the Red Gully from there.
Most parties camp at South Colony Lakes the night before the climb. Day hiking from the 4WD trailhead is possible for very strong, fully acclimatized climbers but adds significant length to an already long day. Day hiking from the 2WD lot adds another 2.7 miles each way and pushes the day to genuinely unreasonable.
Crestone Needle: South Face Route
The standard route up Crestone Needle climbs the South Face from Broken Hand Pass. From the pass, the route traverses up and right along ledges to enter the East Gully system, then climbs the gullies to the summit.
Section 1: Broken Hand Pass to the South Face base
From Broken Hand Pass, the route does not drop into Cottonwood Lake. Instead, it traverses west and up along the south side of the Needle to reach the base of the East Gully. This traverse is on solid rock with good footing but requires you to find the right line. Multiple use trails lead the wrong direction; check your GPS track at the pass.
Section 2: The East Gully (Class 3)
The East Gully is the first sustained Class 3 section. You climb up a gully system on solid conglomerate, using hands continuously. The rock is grippy and the holds are positive, but the exposure builds as you climb. Several plausible lines exist; the cleanest one stays in the gully proper rather than escaping onto the ribs.
Section 3: The Gully Switch (Class 3, route-finding crux)
About two-thirds of the way up the East Gully, the standard route switches to the West Gully via a notch or rib on the dividing wall. This is the section where parties go wrong. Climbing too high in the East Gully cliffs you out near the summit ridge. Climbing too low in the West Gully drops you onto a different aspect of the mountain.
Look for the notch when the East Gully starts to feel like it is cliffing out above. The transfer to the West Gully is short but exposed.
Section 4: West Gully to the Summit
Once in the West Gully, the climbing continues at Class 3 on the same grippy conglomerate. The angle eases near the top. The summit is a sharp point with room for a few people.
Views from Crestone Needle span the entire Sangre de Cristo range, the San Luis Valley below, and the Wet Mountains to the east. Crestone Peak rises directly to the west, with the traverse line visible along the connecting ridge.
Crestone Peak: Red Gully Route
The standard route up Crestone Peak climbs the Red Gully from Cottonwood Lake on the south side of the range. The Red Gully is exactly what the name suggests: a long, sustained, reddish gully that runs nearly from the base to the summit ridge.
Section 1: Cottonwood Lake to the Gully Base
From the pass, descend west into the Cottonwood Lake basin (a 700 ft drop you will pay back on the way out). From the lake, climb west and north on talus to the base of the Red Gully at roughly 13,200 ft.
Section 2: The Red Gully (Class 3 sustained)
The Red Gully climbs 1,000 vertical feet at sustained Class 3. The rock is solid conglomerate. Hand and foot holds are positive throughout. The gully is wide enough that two parties can climb side by side, but rockfall from above is the real hazard. Helmets on from the base.
There is water running in parts of the gully early season, which can make the rock slick. Late season the gully is usually dry.
Section 3: The Notch and Summit Pyramid
The Red Gully tops out at a notch on the summit ridge at roughly 14,200 ft. From here, the summit is a short Class 3 scramble up the summit pyramid to the true high point.
The summit of Crestone Peak is a small platform with room for a few climbers. The view of Crestone Needle to the east shows the full traverse line. Kit Carson Peak rises to the west.
The Crestone Traverse
The traverse between Crestone Peak and Crestone Needle is one of the most respected lines on the Colorado 14ers. The total distance is short (0.4 miles between summits) but the climbing is sustained Class 3+ with exposure that does not let up.
What "Class 3+" Means Here
The traverse stays mostly Class 3, with sections that approach low Class 4 depending on the line. The "+" reflects the sustained exposure: fall consequences are severe over hundreds of feet for most of the route. Strong Class 3 climbers move through it without rope. Less experienced parties sometimes carry a short rope and a few pieces for the harder sections, though placing protection on conglomerate is awkward.
The Standard Direction: Peak to Needle
Most parties climb Crestone Peak first and traverse east to the Needle. The direction matters because the harder route-finding sections are easier to read going east, and the descent off the Needle is the better escape if weather hits mid-traverse.
Key Sections
Black Gendarme. A prominent tower partway across the ridge. The route bypasses it on the south side via ledges. The ledge system is exposed but on solid rock.
The Red Wall. A section of reddish rock that requires careful line selection. Several options exist, all Class 3 to low Class 4. The cleanest line is not always obvious.
The Final Pitch to the Needle. The traverse joins the Needle's standard West Gully route near the summit, finishing on the same final scramble described above.
Time Budget
Most parties take 3-5 hours to traverse from Peak summit to Needle summit. Slow parties take longer. This is on top of the climb up the Peak and the descent off the Needle, making for a 12-16 hour climbing day from the lakes.
When Not to Do the Traverse
Do not attempt the traverse if:
- Weather looks unstable. There is no good bailout point in the middle.
- It is your first time on either peak. Climb them individually first; learn the rock.
- You are not solid on Class 3 exposure. Hesitation in the middle of the traverse is its own hazard.
- You started late. The traverse needs to be done in stable morning weather.
A clean climb of both peaks on separate days is a perfectly respectable trip. The traverse is a goal, not a requirement.
What to Pack
The Crestones gear list overlaps with other 14ers but adds mountaineering items. The route is too long and too consequential to underpack.
Helmet. Required from the moment you enter the Red Gully on the Peak, and on the entire Needle route and traverse. Climbing helmet, not a bike helmet.
Real hiking or approach boots. The talus on the approach is significant, and you want the friction of a sticky rubber sole on the conglomerate. Approach shoes work for experienced climbers; full boots for everyone else. See our hiking boots guide.
Light pack. Whatever you carry on the climbing day you carry up Class 3 terrain. Keep it under 20 lbs for the summit day. Hydration bladder plus the items below.
Water. 3 liters for the climbing day. Refill at the lakes; carry filtration. No reliable water above the basin.
Food. 2,000+ calories for a 12-16 hour day.
Layers. Base, insulating mid, wind shell, rain shell. Sangre de Cristo weather changes fast.
Headlamp. Required. Alpine starts begin in the dark; descents finish in the dark for some parties. See our headlamp guide.
Trekking poles. Useful on the approach and the talus, stowable for the scrambling. See our trekking pole guide.
Sun protection. Sunglasses, sunscreen, hat. The South Colony basin is exposed.
Optional rope and harness. For parties not fully solid on Class 3+ exposure, a 30 m rope and a few cams for the traverse provide a security blanket. This is judgment, not a requirement.
Map and offline GPS. Pre-download the route. The gully transitions on the Needle and the traverse line are not obvious without beta.
First aid kit with serious supplies. You are far from a road. Carry more than blister tape.
Garmin inReach or similar. No cell service. A satellite communicator is the right call on this trip.
Camp kit if overnighting. Tent, sleeping bag, pad, stove. See sections below.
Timing and Weather
The rule on a Class 3 14er is stricter than on Class 1: be off the summit and out of the technical terrain by 11 AM, not noon.
Recommended timing for the traverse, starting from a camp at South Colony Lakes:
- Camp departure: 4:00 AM
- Broken Hand Pass: 5:30 AM
- Cottonwood Lake: 6:15 AM
- Red Gully base: 7:00 AM
- Crestone Peak summit: 9:00 AM
- Traverse complete (Needle summit): 11:30 AM
- Off Class 3 terrain: 1:30 PM
- Back at camp: 3:30 PM
If you start later, you push the traverse into afternoon storm window. The Sangres are notorious for building weather earlier than the Front Range, sometimes by 10 AM in July and August. Treat any building cumulus as a turn-around signal.
The forecast to check is the Westcliffe / Crestone area mountain forecast on forecast.weather.gov. Same general rules as elsewhere in Colorado, but with a stricter cushion:
- Storm probability above 20% in the afternoon: reconsider the traverse
- Wind above 30 mph at altitude: the traverse will be ugly
- Snow falling: turn around
When to Climb
Best months: Mid-July through mid-September.
Through early July: Snow lingers in the upper gullies, especially the Red Gully and the upper Needle. Snow in the gullies turns Class 3 rock into something requiring crampons and ice axe. Most parties wait until mid-July for a dry climb.
Mid-July through August: Peak season. Daily afternoon storms are the rule. Alpine starts are mandatory.
September: The best stable weather window. Cooler temperatures, dry rock, fewer storms. The trade-off is shorter days and the chance of early snow after mid-month.
October through June: Winter and shoulder conditions. The road may not be passable to the upper trailhead. Routes carry snow and ice. This becomes a technical mountaineering objective, not a scramble.
Camping vs Day Hiking
Most parties climb the Crestones as an overnight (or two-night) trip from South Colony Lakes camp. The reasons are practical:
The approach is long. Day hiking from the 4WD trailhead adds 5-6 miles and 2,000 ft to the climbing day. From the 2WD lot, much more. By the time you finish your alpine climb, you have a long walk out.
The altitude rewards a night up high. Camping at South Colony Lakes (around 11,800 ft) for a night before the climb improves acclimatization and lets you start the climb already at altitude.
The weather window is short. Camping at the lakes lets you start the climb in the dark from a base 2,000 ft below the technical terrain, not from the trailhead 5,000 ft below. You arrive at the gullies fresher and have hours of buffer before storms build.
The basin is gorgeous. South Colony Lakes is one of the most striking alpine basins in the Sangres. The Crestones rise straight out of the upper lake. A night here is part of the experience.
Camping notes:
- The basin is in the Sangre de Cristo Wilderness. Standard wilderness rules apply: no campfires above treeline, pack out all waste, camp 100 ft from water.
- Bear canisters are not required but bear hangs are wise.
- See our gear guides for backpacking tents and sleeping pads.
- Filter water from the lakes or creek; do not drink untreated.
Day hiking is possible but punishing. From the 4WD trailhead, a strong, fully acclimatized party can climb the Needle alone in 12-14 hours, or the Peak in 13-15 hours. The traverse as a day trip is reserved for very fit, very fast parties with prior route experience.
What Makes the Crestones Different
The Crestones do not feel like other Colorado 14ers. The differences matter:
The rock. Conglomerate climbs better than almost any rock on a Colorado 14er. Sticky friction, positive holds, solid feeling under your hands. Once you climb it, the loose volcanic rubble on other peaks feels worse by comparison.
The wilderness setting. South Colony Lakes basin is deep wilderness, not a roadside basin like Stevens Gulch. The peaks rise straight out of the upper lake. You feel remote here in a way you do not on Mount Bierstadt.
The technical demands. Sustained Class 3 on both standard routes; Class 3+ on the traverse. This is real scrambling, not the summit boulders. Hands stay on rock for hours.
The route-finding. The gully transitions on the Needle and the traverse line both reward beta and judgment. Casual hikers get stuck or off-route. This is not a peak you "follow the crowd" up.
The commitment. Once you are above Broken Hand Pass, retreat in bad weather is slow. Once you are on the traverse, retreat is harder still. You commit to the route in a way you do not on a Class 2 peak.
Compared to Mount Elbert or Grays/Torreys, the Crestones are a category beyond. Compared to Longs Peak (Keyhole route), the Crestones are technically similar but on much better rock, in a wilder setting, with longer total commitment. For climbers building toward harder routes, the Crestones are a natural step.
Common Mistakes
Attempting the traverse without solid Class 3 experience. The cliché way climbers get into trouble on the Crestones is by overestimating their comfort with exposure. If you have not done Class 3 on real rock, do not start with the traverse.
Ignoring building weather. The Sangres build storms early. A clear morning at 8 AM can be a thunderstorm at 11 AM. Watch the sky from the moment you leave camp.
Underestimating the road. Plan for the 2WD lot. If you make it higher, great; if not, you already accounted for the extra miles.
Route-finding errors on the Needle. The East Gully to West Gully transition is the most common off-route mistake. Climbers continue too high in the East Gully and end up on Class 4 or 5 terrain near the summit. If the climbing feels harder than what you read about, you are off-route. Down-climb to the transition point.
Skipping the helmet. Rockfall from other parties is real. Wear the helmet from the gully base through the descent.
Treating the Peak and Needle as two separate trips that can be done lightly. Even on a single-peak day, the climb is 11-15 hours from the 2WD lot with sustained Class 3 scrambling. Plan as if the peak is your full objective for the day.
Going alone. Solo is a personal choice but the Crestones are not a beginner solo objective. Rope partners help on the traverse, and a partner reading weather and route is genuinely useful.
Skipping the satellite communicator. No cell service for the entire trip. A Garmin inReach or similar device is the right call. Even a sprained ankle in the basin becomes a serious problem without a way to call for help.
Underestimating altitude. Camping at 11,800 ft and climbing to 14,294 ft demands real acclimatization. See our guide to altitude sickness for prevention and treatment.
Other 14ers to Consider
The Crestones sit at the upper end of standard 14er routes. For a sense of how they fit into the broader Colorado 14er progression:
- Mount Elbert: Colorado's highest, but Class 1. A good fitness benchmark. See our Mount Elbert guide.
- Mount Massive: The 2nd highest, also Class 2. See our Mount Massive guide.
- Mount Harvard: Class 2, long approach, builds the endurance the Crestones demand. See our Mount Harvard guide.
- Mount of the Holy Cross: Class 2 with a long approach and real solitude. See our Holy Cross guide.
- Grays Peak and Torreys Peak: The standard Front Range double, Class 2. See our Grays Peak guide.
- Quandary Peak: Class 1 near Breckenridge. Good acclimatization climb. See our Quandary Peak guide.
- Mount Bierstadt: The first 14er for most Coloradans, Class 2. See our Mount Bierstadt guide.
- Pikes Peak by Barr Trail: An endurance day, Class 1. See our Pikes Peak guide.
For the broader list of approachable 14ers, see our easiest 14ers guide.
Final Thoughts
The Crestones are real mountains. Crestone Peak and Crestone Needle individually are among the finest 14ers in the state, climbed on rock that is unusually solid for Colorado, in a wilderness basin that feels untouched. The traverse between them is one of the great Class 3+ lines on a 14er and deserves the respect it gets.
The keys to a clean trip: acclimatize first on a Class 2 14er, build Class 3 experience on routes like Wetterhorn or Sneffels, plan around the road, camp at South Colony Lakes for the night before, start in the dark, watch the weather, and turn around if the route or the sky goes sideways. The mountain is not going anywhere.
For trail stats and maps: Crestone Peak trail page and Crestone Needle trail page. For the supporting gear, see our guides to hiking boots, rain jackets, headlamps, trekking poles, backpacking tents, sleeping pads, and our altitude sickness guide.
Get the Colorado 14er Packing Checklist (free PDF)
Plus a weekly note on the best Colorado trails, gear deals, and seasonal hike picks. No spam, unsubscribe anytime.
We respect your inbox. Unsubscribe anytime.